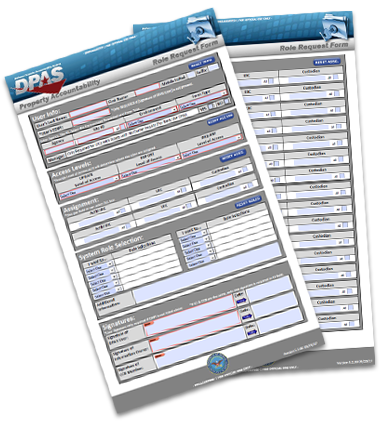
 This form can be broken into five sections:
- User Info - Please complete User’s Last Name, First Name, Middle Initial and EDIPI (Note: EDIPI only required if signature of DPAS User is not present at the bottom of the page. Next type in your Force and Force Command(s). Then select from the drop-down menu which environment is being requested as well as form type (New User or Update User).
- Access Levels - Determines Tier level where user’s Update, Report, and Inquiry roles will be applied for use. Make a selection from the drop-down menus provided.
- Assignment - Establishes what information the user can see. Note: if more assignments are needed than available in this section, there is an Extra Assignments section on page two of the DPAS Roles Request Form.
- Role Selection - Determines the types of transactions or functions you can perform or will be removed by selecting “Add this Role” or “Delete this Role” and then selecting necessary role(s) from the drop down menu. Please add any additional Information that may assist the Account Mgmt team in processing the request.
- Signatures - The User Signature is only required if EDIPI is not present at top of form. If IO and CCB are the same, only the IO Signature field needs to be complete. If IO is not CCB and are requesting Agency level update roles, a CCB member signature is required.
We recommend that you open this form electronically using Adobe Acrobat. You can easily complete the form and avoid common errors with the built in rules programmed in the electronic form. Adobe Acrobat Reader is available for free from the Adobe website.
Keep the following in mind when you complete the electronic form:
- Each section has a reset button to the right.
- Whichever Access level you select for Update, Report, and Inquiry, you should have the appropriate matching information listed in the Assignment section. (For example: If you choose Force Group for Update, Report, and Inquiry - you should have the needed Force Group(s) listed under assignment.)
- If Access Level for Update is set to Force Element, you must also enter a Force Element.
The form can be downloaded with instructions:
Section 2 - Access Levels
There are four levels of access in the Force Systems Management module. Understanding these levels will ensure the proper access is granted.
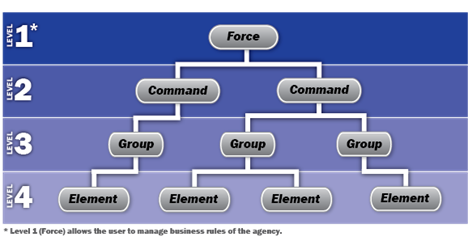
- Force - top level of access. Users at this level have access to all assets for all Site Ids throughout the entire Force Systems Management (FSM). This level is only available for Standard user types at the Report or Inquiry level. Users assigned to the FSM Coordinator role have to be assigned Force level of access for Updates. This is a system requirement. Again any update role at the Force level require a CCB Member signature if the IO isn’t appointed at the Force level.
- Force Command - users at this level can manage all assets and authorizations for the entire Command Id.
- Force Group - lower level with access privileges are restricted to the Group specified on the form. With this level, one will have visibility of all Groups and Elements that fall under the specified Group. With this level, one can manage assets at this level to include all Elements within the specified Group.
- Force Element - lowest level of access. At the Element level, a user can only see property or assets assigned to their account.
Once you have an understanding of the access levels, you can assign functional categories to a level. These categories are:
- Updates - managing assets
- Reports - generating and running a standard or customized report
- Inquiry - looking up specific information about an asset or assets
For each Level of Access category, only one of the four levels may be assigned on the Roles Form.
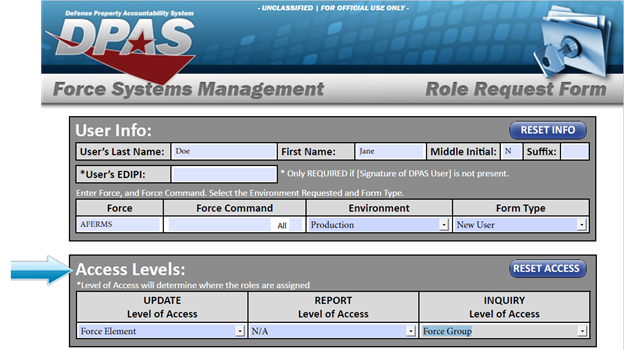
For example, a user may be able to update or manage assets at a low level (Force Element) and run reports or generate inquiries at a higher level (Force Group). In another example, a user can update assets at the Group level but may run reports and generate inquiries at the Command level.
Section 3 - Assignment
Based on the Access Level selected, the corresponding Assignment information should be completed.
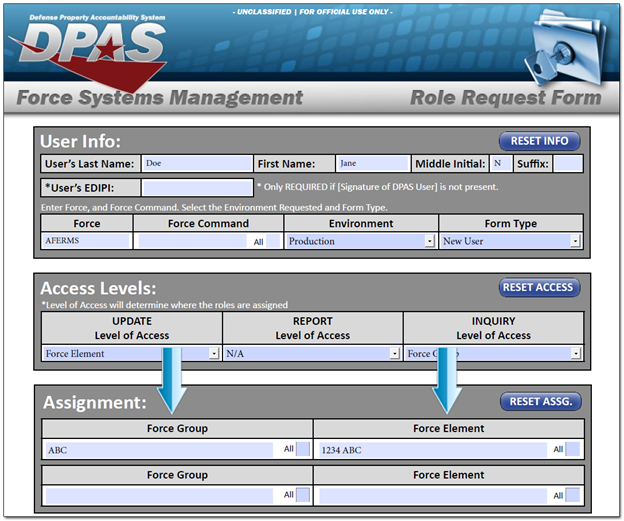
Note: if more assignments are needed than available in this section, there is an Extra Assignments section on page two of the DPAS Roles Request Form.
Related Links:
Section 4 - Role Selection
Each process in Web DPAS is assigned to a specific role. Every user is assigned one or more roles in the system.
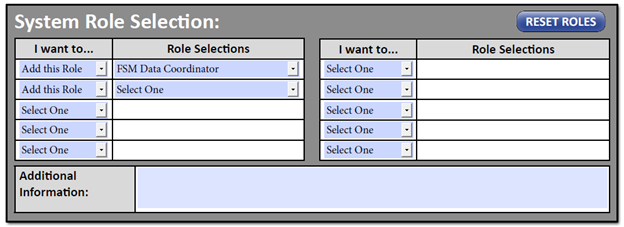
Partner with your Information Owner (IO) to determine which roles are required. All roles are listed in the drop down menu once you select whether you want to add or delete. If you are not sure who your IO is, please contact the DPAS Support Help Desk for guidance.
- Roles Spreadsheet - XLS (270 KB)

In the above example, note the functional differences between the Force Officer and FSM Inquiry roles:
- Menus - the Force Officer role has access to additional menus such as Master Data Mgmt, Authorization Mgmt, and Utilities.
After reviewing the access levels and roles, you must complete the necessary information on the DPAS Roles Request form. Contact your supervisor or the Information Owner (IO) for your agency if you have questions regarding your choices.


